
The Hard Drive Rescue
⇒ Disclaimer
This post has been in an early draft state for over 2 years. Things haven’t changed much since then, so I decided to finish writing it up in case anyone else gets into a similar pickle.
Note: The extent of my knowledge on hard drives and data backups is limited to the research I did during this period of time. It wasn’t too thorough, so if I’ve misinterpreted anything please let me know. Also, some of the steps I took may have been unnecessary or redundant, but they ultimately guided me towards a working solution.
Situation
Laptop: Acer Aspire V3-571G
OS: Windows 10 64-bit
One morning, a little over 3 years after purchasing my laptop, this dialog flashed onto its screen:
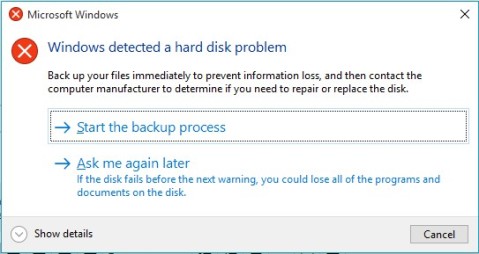
Uh-oh
After an initial moment of panic, I immediately sought a drive replacement with a laptop-compatible form factor of 2.5-inch (width) by 7mm (height). I decided on Seagate’s 500 GB Laptop Thin SSHD, a hybrid drive that promised faster boot time and better performance than a regular hard drive, at a lower cost than a full-blown solid-state drive. It was priced at about $50 at the time and is still sold in limited capacity on Amazon. I also picked up a USB 3.0 2.5″ SATA enclosure for around $9 to connect the new drive for data transfer.
Diagnostics
As my replacement hardware prepared for shipment, I began to run diagnostics on the failing drive, hoping to better understand what had happened. I started with Windows’ built-in sfc /scannow to check for corrupt system files, then followed up with chkdsk C: /r to inspect the filesystem and its metadata for both logical and physical errors. According to Microsoft’s docs, the /r flag locates bad sectors and recovers readable information while including the functionality of /f, which fixes errors on the disk and performs an additional analysis of physical disk errors. The command asked to schedule a scan upon reboot since I was on C:\, so I hit ‘Y’. After waiting 5 hours for the operation to complete on my 500GB drive @ 90% capacity, I looked in the output file to see that 20 out of 13,281,437 processed clusters had gone bad. This was intriguing, but I wanted to dig a bit deeper, so I tried some third-party utilities in an effort to glean more information:
- HGST WinDFT: I ran some quick tests which didn’t provide very helpful results.
- Seagate SeaTools: I ran most of the provided Basic Tests, such as ‘SMART Check’, ‘Short Drive Self Test’, and ‘Short Generic’. Unfortunately, they only displayed a simple Pass or Fail, which wasn’t as informative as I’d hoped. The ‘Drive Information’ option did reveal some interesting info though, including lifetime bytes read/written as well as total power-on hours.

Example SeaTools test result
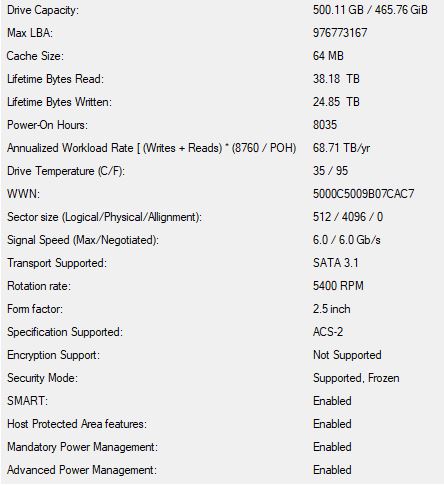
Drive Information (for my current SSHD)
- PassMark DiskCheckup: I navigated to the SMART Info tab and looked at the raw values for ‘Reallocated Sector Count’ and ‘Current Pending Sector Count’. ‘Reallocated Sector Count’ marks the sectors in which data has been transferred elsewhere due to a read/write/verification error, while ‘Current Pending Sector Count’ marks sectors that are waiting to be remapped due to unrecoverable read errors. In my case, those numbers were 8 and 96 respectively, when ideally they should have been 0. Both would have likely increased as my HDD continued to deteriorate, meaning it was simply a matter of time before a sector in an important cluster (e.g. inside System32) became corrupted. I wasn’t sure if that meant data would be permanently lost, but I definitely wasn’t willing to take the risk of waiting to find out.
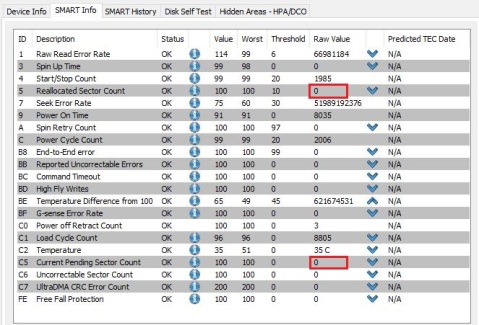
DiskCheckup’s ‘SMART Info’ tab (for my current SSHD)
Initial Attempts
My initial plan was to make an image backup onto an external HDD, which I would restore from on the new drive. To that end, I tried several free tools:
- Windows Backup: Extremely slow to transfer.
- Veeam Endpoint: Didn’t allow imaging a disk with bad blocks, period.
- EaseUS Todo: Froze on both cloning and imaging.
- Macrium Reflect: Didn’t work at first, but there was an option to ignore/log bad sectors – tried this a couple of times, but data transfer would slowly drop to a crawl and not show signs of finishing.
Reflect’s imaging process started working after another chkdsk pass, so I decided to run chkdsk a third time on C:\, this time with the /b flag, which includes the functionality of /r while also clearing the bad clusters list and rescanning free/allocated clusters for errors. Note that this parameter only works on NTFS drives, and Microsoft suggests using it after imaging a volume to a new HDD. The third chkdsk scan log removed 20 clusters from the Bad Clusters File while only adding 12 back in, so it seemed like some progress was made. However, throughout this process I began to realize that simply imaging the disk wasn’t enough – I wanted to boot from exactly where I left off of the failing drive, and preferably without backup & restore operations taking dozens of hours. In order to do this, I’d have to clone it bit-by-bit.
Solution
Once my replacement drive arrived, I put it in a SATA enclosure and plugged it in via USB. Then, I formatted it using the following commands in Windows’ DiskPart utility:
-
list disk– displays info about each disk attached to the systemselect disk [number]– selects the disk number to focus on (be careful to select the disk number that corresponds to the new drive!)clean– removes all partition or volume formatting from the disk with focuscreate partition primary align=1024– creates a primary partition on the disk that is 1024 KB from beginning to closest alignment boundaryformat fs=ntfs quick– performs a quick NTFS (default Windows filesystem) formatting of the newly created partitionassign– assigns next available drive letter to the volume with focusactive– marks the newly created partition as the system partition
Next, I downloaded an older version of Parted Magic (a Linux distro with data recovery utilities installed) and used UNetbootin to create a bootable version on a USB stick (≥1.0GB should be sufficient).
Then, I recall having to set an administrator password in order to turn off UEFI Secure Boot, which let me boot into Parted Magic from the USB stick.
Once in, the first tool I tried was Clonezilla. It was going well until I ran into some issues related to MBR/GPT and the tool couldn’t seem to find my replacement drive.
As a last resort, I turned to GNU ddrescue. Its manual was a valuable reference for me throughout this process. I ran fdisk -l to list connected drives and noted their sd[letter] values. Next, I ran ddrescue -f -n -v /dev/sda /dev/sdc outfile.log. On this first pass, -f forces overwrite on output device or partition, -n skips over failed blocks and notes them on the log, and -v displays verbose output. Specifying an outfile.log allows ddrescue to pause/resume a clone operation, because physical addresses along the drive can be saved. I followed up with ddrescue -f -r1 -v /dev/sda /dev/sdc outfile.log. On this second pass, the only difference is -r1, which makes ddrescue split/retry the failed blocks from the first go. Do note that outfile.log is not saved when you shutdown out of Parted Magic.
Closing Remarks
After the ddrescue clone, I tried to test booting from the new SSHD right away by placing it first in the boot sequence – this resulted in an “inaccessible_boot_device” Blue Screen of Death. Booting from Safe Mode didn’t work either. Then, to make matters worse, my original HDD wasn’t showing up in the BIOS, so my laptop had nothing to boot from. I figured it was now or never to replace the HDD inside of my machine. Surprisingly, the replacement SSHD worked perfectly, and has been powering my laptop admirably in the nearly 2 1/2 years since installation.
As a takeaway, what I can suggest is to download a free backup application for frequent imaging. There are distinctions between differential and incremental backups that you’ll want to be aware of – the former backs up files that have changed since the last full backup, while the latter backs up changed data since the last backup regardless of whether it’s a full, differential, or incremental. Out of the 4 tools I used during this process, I stuck with Macrium Reflect, with a custom backup definition XML file that I run every couple of weeks (which should ideally be daily 🤫). However, one important task I’ve yet to do is actually test my backup & recovery process! I’d appreciate some pointers on how to do this with reasonable efficiency.
As for clones, I’m not sure how useful it would be to make them frequently, as opposed to waiting until a disk starts showing signs of failure. To me, it’s a trade-off between time spent versus the convenience and peace of mind of being able to instantly pick up where you left off after a failure. The safest method would be to image and clone your healthy drive often, with images targeting a high-capacity external drive and clones targeting a compatible or identical internal drive. In the case of a failing drive, since none of the proprietary programs worked for me, I would suggest booting in from a Linux distro like Parted Magic or GParted and using ddrescue.
Welcome!
This blog will be subject to the whims of whatever new technology or hobby I pick up. Expect some musings on web development/programming, cryptocurrency, finance/trading, music production, quantum computing, and more!

Recent Comments